While most people today live connected lives with a multitude of electronic gadgets at their disposal, only a few bother to think about the hardware components that go into their smartphones, gaming consoles, or computers. However, it is relatively easy to learn about the specifications of the phones and PCs you use in your digital life. With that said, let us show you how to check the hardware specs and configuration of your Windows 11 PC.
Check Hardware Specs and Configuration of Windows 11 PC (2021)
There are many ways to check the hardware specifications of your Windows 11 PC, and we will detail them all in this article today. You can check the hardware specs of your Windows 11 computer via the Settings app, System Information, DirectX Diagnostic tool, Command Prompt, and a myriad of third-party applications. So let’s get started!
Steps to Check Hardware Specs of Windows 11 PC
As we mentioned above, there are various ways to check the hardware specifications of your Windows 11 computer. We will explain all of them here in this guide, starting with the easiest method – via Windows Settings.
Method 1: Using the Settings App
The easiest way to find information about the hardware on your Windows PC is using the Settings app. Here’s how you do it:
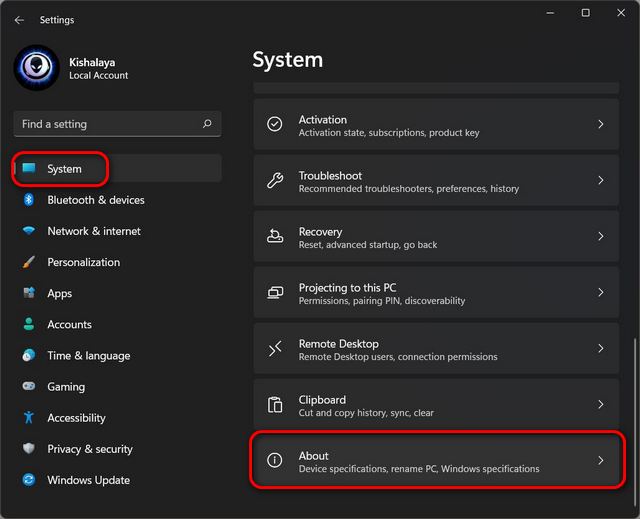
- Open the Settings panel using the Windows 11 keyboard shortcut Windows key + I. Now, go to ‘System -> About‘.
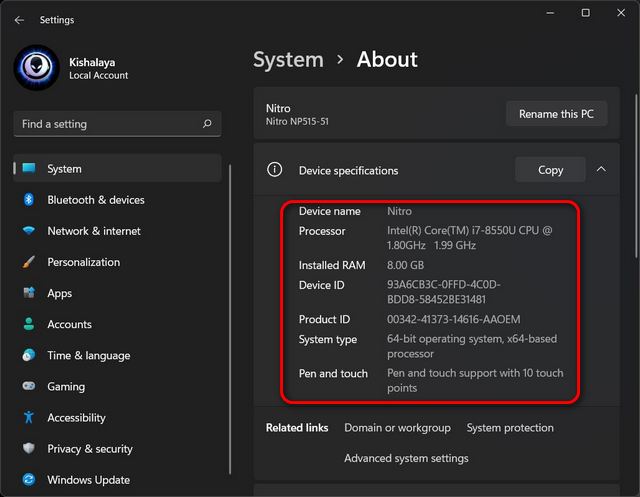
- Under the Device specifications section, you can check the key hardware specs for your Windows 11 PC, including the processor, system memory (RAM), architecture (32-bit or 64-bit), and more.
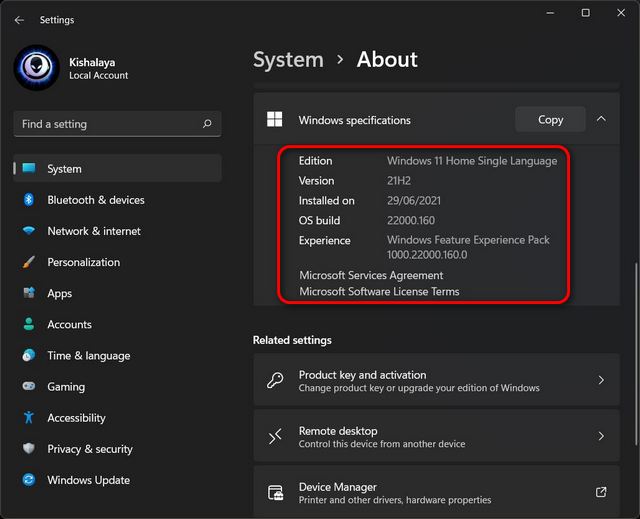
- Now, scroll down a bit to the Windows specifications section to check information about your operating system. It includes the edition, version, installation date, OS build , and the service pack (Microsoft calls it Experience).
Method 2: System Information (msinfo32)
Another easy way to check the hardware specs of your Windows 11 PC is through the System Information panel. Here’s how you do it:
-
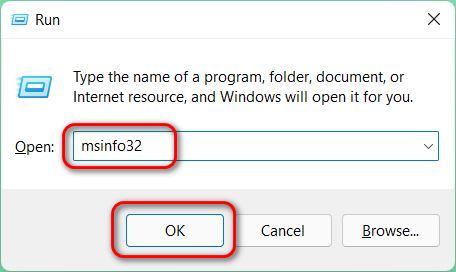
Open the Run dialog box by pressing ‘Windows key
+ R’ simultaneously. Then, type in or copy +
paste
msinfo32and hit Enter.
Note: You can also access System Information by searching for ‘sysinfo’ (without quotes) in the Windows search bar.
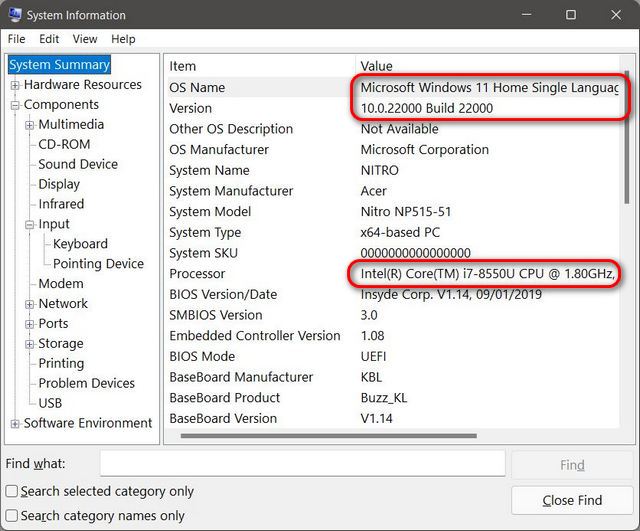
- With System Summary selected on the left sidebar, you can check several aspects of your computer’s hardware. It includes the system model and type, processor brand and model, UEFI/ BIOS version, RAM capacity, motherboard brand and model, and also virtualization support, among other things.
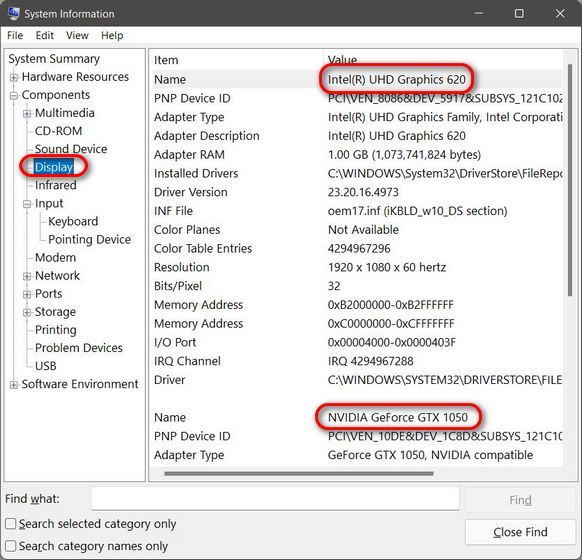
- To see details about installed GPU(s), expand the ‘Components’ branch on the left sidebar and click on Display. Similarly, clicking on the other component branches will give you more detailed information about network adapters, input devices, optical drives, etc.
Note: The System Information applet also lets you create a report about your PC’s hardware and software specs. To do that, use the left sidebar to select which tab you want to save for later reference. Then, go to ‘File -> Export’ to create the report. Here, selecting ‘System Summary’ will export everything.
Method 3: DirectX Diagnostics (dxdiag)
Windows 11 also includes the DirectX Diagnostic Tool (dxdiag) to view information about DirectX audio and video support. You can also use it to check many system specs. Here’s how:
-
Open the Run dialog box as described in Method 2.
Now, type in
dxdiagand hit Enter.
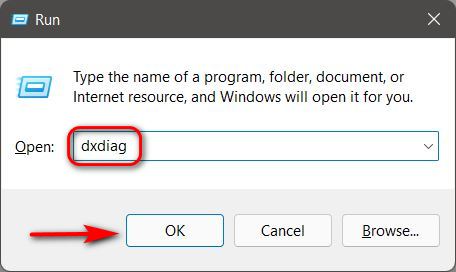
Note: You can also search for ‘dxdiag’ (without quotes) in the Windows search bar to access the feature.
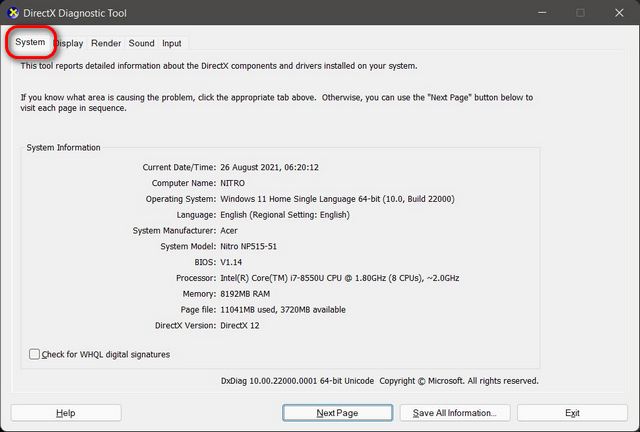
- Once on the DirectX Diagnostic page, click on the System tab. Here, under System Information, you will find most of the basic tech specs, including processor, memory, BIOS/ UEFI version, system model and manufacturer, Windows 10 version, and more.
- Now, move to the Display tab at the top. Here, under the ‘Device’ section, you can find details about your GPU, including the name and manufacturer, graphics memory, and display details.
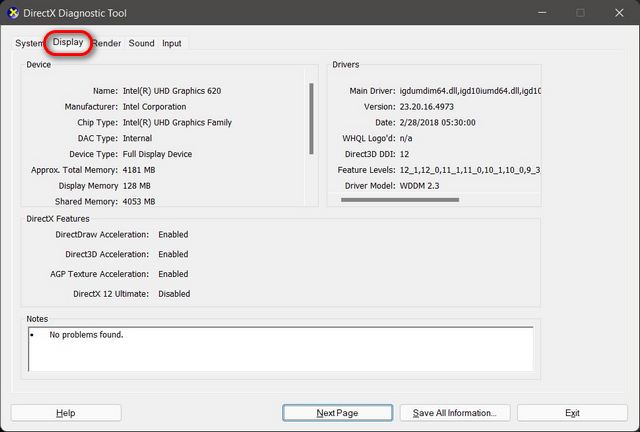
Note: You can create a specs report for future reference using the ‘Save All Information’ button at the bottom.
Method 4: Command Prompt
With the Command Prompt, you can view hardware specs of your Windows 11 PC using the ‘system information’ command-line tool. Here’s how it works:
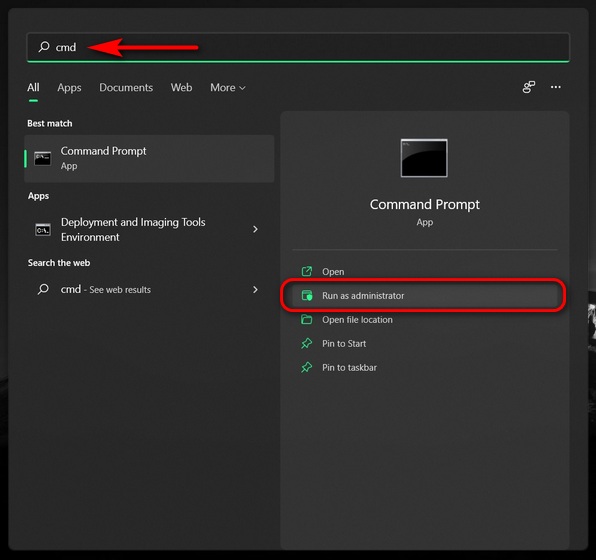
- First, open a Command Prompt window in Admin mode. To do that, search for ‘cmd‘ (without quotes) in the Windows search bar and select Run as administrator.
-
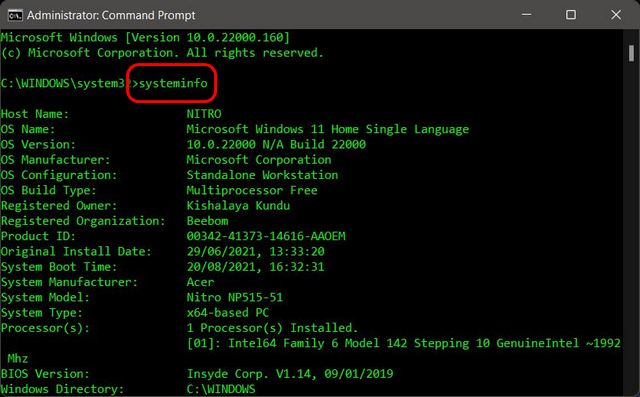
Now, type in or copy + paste
systeminfoin the Command Prompt window and hit Enter. You will see detailed hardware and software information about the computer. It includes info on the system architecture, whether it uses BIOS/ UEFI, RAM, network details, and Windows 10 update information.
Method 5: PowerShell
You can also use PowerShell to view the system specifications of your Windows 11 computer. Follow the guide below to do that:
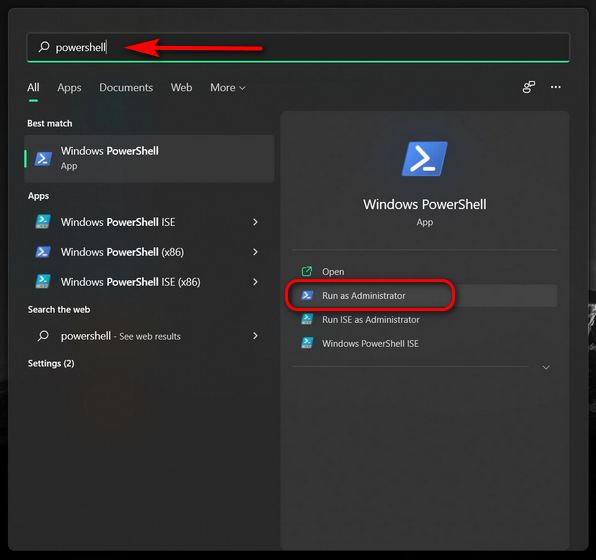
- Firstly, open Windows PowerShell in Admin mode on your PC. To do that, search for ‘powershell’ in the Windows search bar and click Run as Administrator.
-
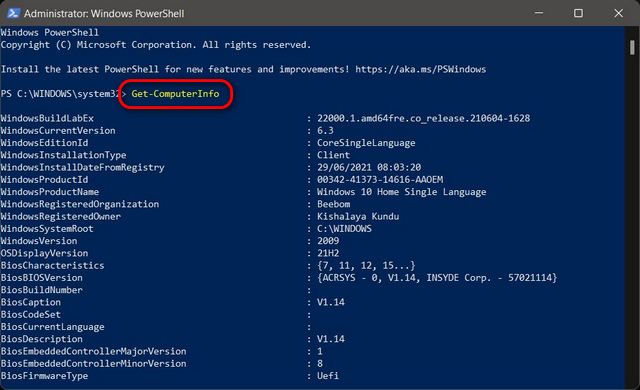
In the PowerShell window, type
Get-ComputerInfoand press Enter.
-
To view details of a specific component, use the following modified
command:
Get-ComputerInfo -Property "property name*". Replace “property name” with the name of the component you want more information on. For example, to get details about your Windows installation, use the following command:Get-ComputerInfo -Property "windows*"
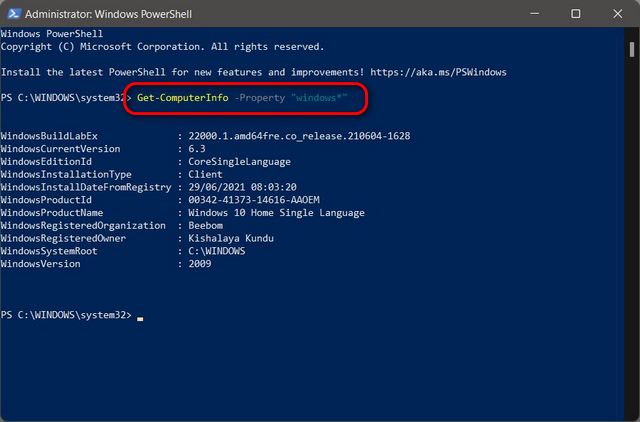
Note: The asterisk at the end is a wildcard that ensures PowerShell will display every property that starts with ‘Windows’.
Method 6: Device Manager
Alternatively, you can natively view the system specs on your Windows 11 PC through the Device Manager. Here’s how you do that:
-
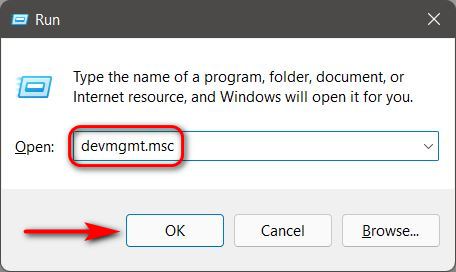
Open the Run dialog box as explained earlier in
the article. Then, type in
devmgmt.mscand hit Enter. The Device Manager window will now open.
Note: You can also open Device Manager from the Control Panel, from Settings (System -> About -> Device Manager) or by searching for ‘devmgmt’ (without quotes) in the Windows search bar. Another way to open the Device Manager is by right-clicking on the Start button and selecting the Device Manager option from the pop-up menu.
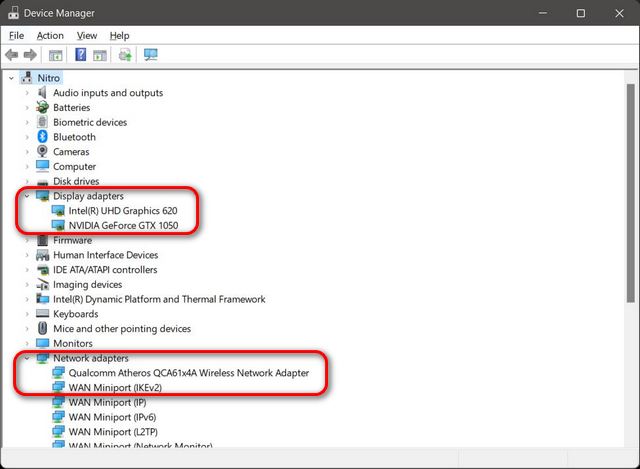
- Device Manager displays a list of everything that’s built into your PC, either desktop or laptop. Go through each item on the list and check the names and model numbers of the hardware specs in your Windows 11 PC.
Method 7: Third-Party Applications
Alongside the aforementioned native methods, there are also a plethora of third-party applications that offer you information about your system hardware to varying degrees. Some of the oldest and most accurate ones are listed below:
- CPU-Z (download)
- HWiNFO (download)
- AIDA64 (download)
- Speccy (download)
- Open Hardware Monitor (download)
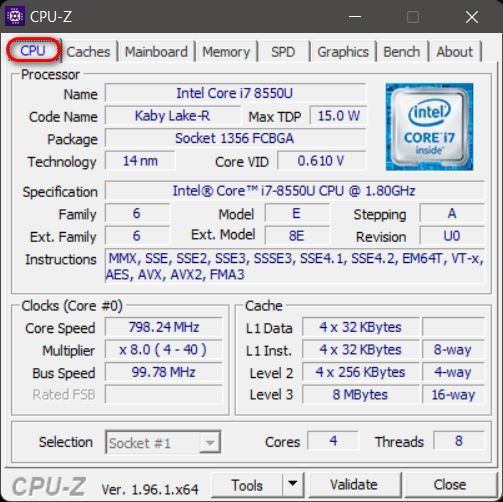
All of these tools are either free-to-use or shareware, with the last one even being open-source. You can use them to check information about your computer’s hardware. For demo purposes, we are using CPU-Z, which offers detailed information about the computer’s CPU, motherboard, RAM, GPU, etc. Open the program and navigate to the relevant tab to get all the details about that component.
Method 8: Open up Your Computer Case
If you are the DIY type, the best way to glean all the details about your system hardware is to open up the PC case. Once you open up the computer, you will be able to physically inspect individual components to find more details about your Windows 11 PC’s hardware.
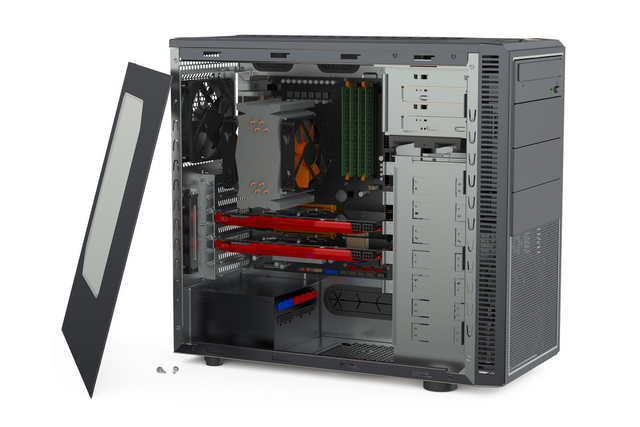
Most of the hardware parts have at least the basic information printed or inscribed on them. That includes the CPU, GPU, motherboard, RAM, PSU, etc. For custom-built PCs, you can find all the info, although it might be a little more difficult in the case of OEM devices.
Easily Check Your Windows 11 PC Hardware Configuration!
As you can see, checking the full configuration of your PC is relatively easy. The best part is that there are multiple ways of doing that, and we have covered pretty much all in our article today. So now that you know how to view the hardware specs of your Windows 11 PC, check out a few other guides that might be of use for you. That includes how to prevent your PC from overheating, how to improve your Windows laptop’s battery life, and how to change Power Mode settings in Windows 11.
Article Source
and If you are the owner of the content and If you wish to take away this Material from our web site please Email us
